Finding defects
This part of the course is devoted into further discovery of defects in software.
Software is secure if the software keeps behaving correctly even in unexpected situations (one may argue what the correct is). However, in order to make secure software one needs to know how the software breaks. When you understand how it breaks you know its weaknesses. These weaknesses could be used to make an exploit against the software. One way to fix the situation is to fix the weaknesses but sometimes the fix may take you back to the drawing board and force you to redesign the software.
The weakness may be a bug that manifests itself on the implementation level. However, some of the more serious flaws in software are design flaws on the design level which are harder to find. Moreover, some security related flaws come from the business logic level. Sometimes the security flaw may be caused by all of the above together.
There is a high probability of a software having weaknesses and a chance of someone trying to exploit them. The probability to have weaknesses rises when the software gets more complex and has dependencies. Moreover, the attack surface against the software gets bigger.
Binary Exploit
Here, we use the term Binary Exploit as an umbrella term to exploit compiled applications in a way that leads the processor to function in an unwanted way. This includes accessing or altering the memory of the application (or memory spaces outside the applications intended boundaries).
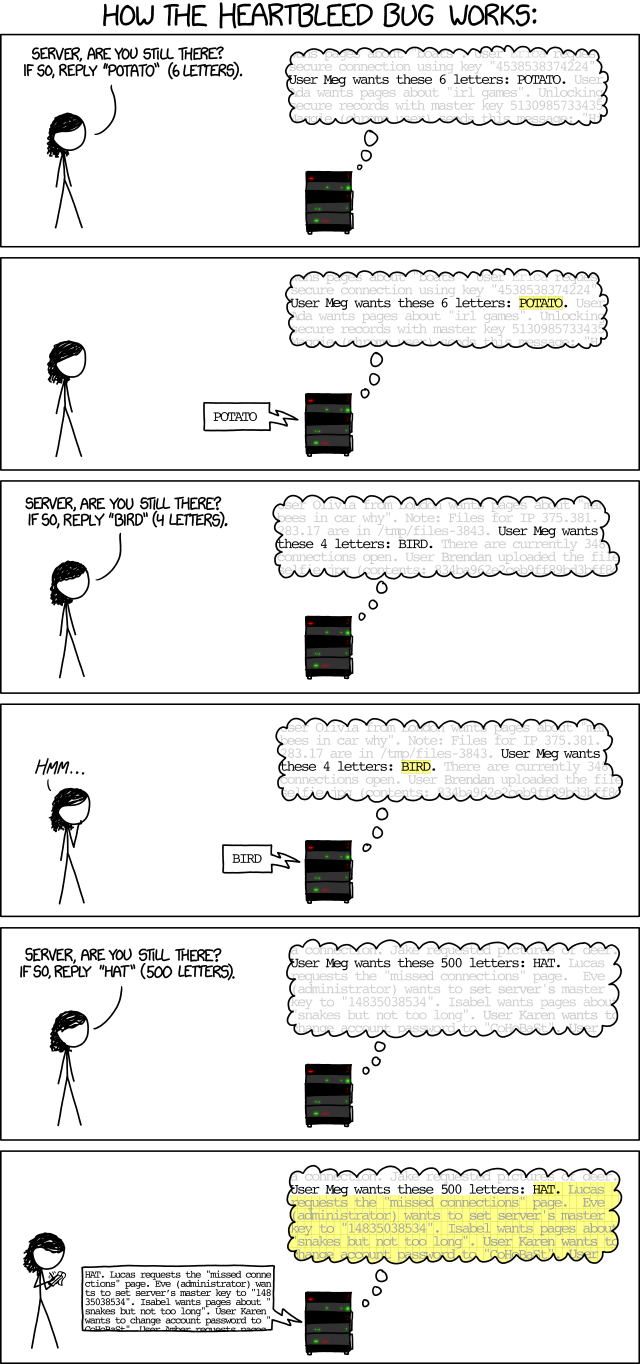
One of the most common weaknesses gives an attacker the possibility to run code on your system, which may have severe consequences. Here, the attacker will abuse a flaw in the software in order to make it do something it was not designed to do. As an example, you may have heard of the Heartbleed bug:

(source xkcd: How the heartbleed bug works.)
Before a program is executed, it is loaded into memory. Once in memory, the program can be executed, which is done by creating a process in the operating system. The operating system also provides a chunk of memory for the use of the process.
The memory chunk is divided into four sections called stack, heap, code and data.
The stack contains a collection of frames, each containing local variables and function parameters and saved register values. Heap is an area that is used for dynamic allocation of memory during the process runtime. When comparing the stack and heap, each frame in the stack is alive only until the function that the frame represents is returned from, whilst the heap contains objects that are kept in memory until they are explicitly freed.
The code section contains the executable code of the program, and finally, the data stores the global and static variables.
When a processor is executing the process, it uses the instruction pointer to identify the current operation. When a function is called in the code, the processor stores the function parameters and its current state into the stack, and loads the necessary details of the function into use. When the function finishes, the stack frame that was stored is popped from the stack and execution continues.
Note that the above is highly dependent on the way the execution is implemented.
If the attacker is able to write over the instruction pointer, then the attacker can direct the execution of the process to code in an unexpected location. But how can an attacker get their malicious code to the memory? One way would be to identify and exploit a buffer overflow that writes the malicious code to the stack and then overwrites the return address in the stack frame. This way, once the function tries to return, it sets the instruction pointer to point to our malicious code instead of the real return address.
As an attacker, we would like to make the instruction pointer to point to the the start of the malicious binary code. Often, however, we do not know where exactly the code starts and thus, we have to guess. One could try to debug the program execution and input a known value to the buffer and then search for it and identify the address of the value. However, the address may differ across executions, but usually it is close by.
Finding the malicious code may be made easier by writing a bunch of NOP instructions (No Operation Instruction) in front of the malicious binary code. A NOP instruction does nothing but advances the execution to the next instruction. If we jump into these big NOP blocks, the instruction pointer just slides forward until it reaches our malicious code — this kind of technique is called a NOP slide.
One source of potential binary exploits is improper memory management. In some languages, like C, dynamic memory is manually managed by the programmer. Undesired behaviour can occur for example when the programmer forgets to allocate (reserve) memory, allocates the wrong amount of memory, forgets to deallocate memory (results in a memory leak), or tries to use memory that has already been deallocated.
Binary Exploits and Higher Level Languages
One might think they don't have to worry about binary exploits since they're
programming with a higher-level language such as Ruby, Python, or Java.
Unfortunately, your application may still be vulnerable to these same problems.
If your higher-level language is interpreted, the interpreter might use a unsafe language. For example Ruby and Python are both implemented in C. If there is a security vulnerability in their code, such as a buffer overflow, all the software that uses the vulnerable part is also vulnerable to the same problem.
Many programs written using higher level languages are taking advantage of so-called native extensions. Native extensions are functionality that has been implemented with a lower-level language mostly for performance reasons. Most of these extensions are made with C and suffer from the same security risks as all the other C-programs.
Fuzzing
How to check against these flaws? The developer can read the code and try to find problems or use an automated tool for static code analysis in order to find suspicious code constructs. Another way to find problems is to try out as much of different inputs as possible. This is called fuzzing (by Dr. Miller in the early 1990s).
Fuzzing is a technique in which you create randomized inputs and feed them to the target application in order to find crashes. Fuzzing is closest to black-box methodology as you give the application an input and watch what happens (fuzzers may also create valid inputs randomly). Fuzzers can be employed as black-, grey- or white-box testing, depending on the access to the target applications source code. you can get benefits from the source code as you can better design the fuzzed inputs. Fuzzing can be divided into two basic categories, to mutation and to generation based fuzzers.
Some good starting values that the fuzzer should consider.
- Long strings
- Blank strings
- Maximum values
- Minimum values
- Small values
- Large values
- Maximum divided by 2, 3, and 4 and near values
- null
- New line characters
- Semicolons and other separators
- Format string values (%s)
- Keywords
Fuzzer are great as with little effort fuzzers can create inputs that test the most obvious cases. Fuzzing can find bugs that were missed in the manual code review and gives an overall picture of the robustness of the code. However, they cannot find bugs that alter the program execution but do not end in a crash. Moreover, when you find a crash you still have to find what was the real cause for it. The simplest way the crashes can be caught is to monitor the CPU usage of the process or by running the application under debugger or other test harness.
Blind fuzzing
The simplest way to fuzz is to create inputs randomly without any knowledge of valid inputs or of context. This is called blind fuzzing. The simplest way to implement this would be to pipe /dev/random in Linux as the input. This is efficient as it takes very little effort in creating the fuzz. This kind of fuzzing could be used against, e.g., compression algorithms. Then again the total randomness of it is also its weakness. Many applications expect some structure in their inputs. Let's consider image manipulation applications, they expect that the read file (input) starts the certain way, e.g., the JPEG File Interchange Format (JFIF) says that the file starts with FF D8 in hexadecimal. If the first bytes are not recognized the application should inform the user of incorrect file format. As another example, network protocols expect the data to be presented as with some structure containing key value pairs and even field lengths. These kind of applications need more intelligent fuzzing than just blind fuzzing. The fuzzer should at least have rudimentary knowledge of what makes the input valid which makes creating the fuzz harder and it becomes a balancing act of how much work you put into creating the fuzz and how complete coverage of inputs you want it to have on the targeted application.
First step towards the smarter fuzzing is the mutation-based fuzzing in which a large number of valid inputs are taken and then mutated in various ways. Some parts of the valid inputs may experience bit flips, some parts of them might be repeated, deleted, replaced, shuffled. Although mutation-based fuzzing takes the valid inputs as its input the mutations are still random by nature. and no coverage of the inputs is not guaranteed. These simple mutation-based methods are good start for fuzzing simple network protocols, e.g., the fuzzers acts as the man-in-the-middle and intercepts valid messages from the client, mutates the messages, and gives them to the server. However, complex protocols need more intelligence from the fuzzer.
Smart fuzzers
If mutation-based fuzzing was called dumb-fuzzing, the generation-based fuzzing is called the intelligent fuzzing. In generation-based fuzzing the input is created from scratch based on the used specification or input format of the targeted application or protocol. The input creation is then split into chunks, which are built in order and independently. Randomness is introduced inside the chunks. This way the inputs are not completely broken but contain some fuzzed parts. How to split the inputs into chunks is usually defined by the input format, e.g, fields such as key-value pairs etc. make good split points for chunks.
Evolutionary-based fuzzing is basically the same as the mutation-based above but it adds heuristics to the fuzzing which change the fuzzing on every iteration. These fuzzer would look what the previous attempts did and change the behaviour so that more parts of the code would be covered. These kinds of fuzzers need compile-time instrumentation which adds instructions to the source code of the targeted application that will allow monitoring of how the input changed the execution path inside the application. Sometimes this kind of fuzzing is called Instrumented fuzzing.
An alternative way for the randomness is to locate a large set of sample inputs. Which are then fed to the instrumented application and out of those runs the coverage of the execution path is recorded. Based on the execution paths minimal set of inputs are collected that cover the most execution paths inside the target. This is commonly called the corpus distillation, which aims to calculate a set of inputs that is manageable in size and covers lots of unusual execution paths in the target. The problem here might be how to get big enough set of sample inputs.
Maybe the most complicated and time consuming is the Model-based fuzzing, also known as syntax testing. In Model-based fuzzing the inputs are modeled using context free languages. The commonly used languages include such as Backus-Naur Form or Backus Normal Form (BNF), Abstract Syntax Notation (ASN.1) or an Extensible Markup Language (XML) doctype. With these languages fields in the syntax are modeled, manipulated and given as input to the target application. The modeling can be time consuming and hard with the context free languages but complex protocols such as Transport Layer security (TLS) would be hard to fuzz with other methods.
Fuzzing on the web
Fuzzing is not only related to binary applications, but can be used as a method to test practically any application. When working with web applications, one could for example seek to determine the types of inputs that could influence the database of the application or cause a crash. In such a case, the security analyst would determine the input parameters and paths that the application may accept, generate (either automatically or manually) a list of values to attempt, and run the tests against the application.
Next, we will look into tools for this in more detail.
Tools section
This section gives a brief introduction to couple of common tools in the trade. This is only a small scratch of the surface and further tutorials and examples can be found from the Internet.
Fuzzing
The previous sections have talked about fuzzing and it should now be clear that for a successful fuzz the work flow is similar to the following.
- Gather input samples
- Fuzz the samples
- Run the tests
- Wait for a crash
- Start over again
About the gathering of the sample file set, one could get by with generating the samples out of thin air randomly. However, better results can be gotten with a set of samples to start from. The samples should represent the features of the format to be fuzzed. In case of network protocols captures of the real traffic are good starting points (with tools such as wireshark or tcpdump). Sometimes just random files from the web will do. For example, bunch of available PDFs from the web for testing PDF tools or images of corn from the web to test image conversion tools.
There are many and many more fuzzers in existence. They basically do the same thing but under the hood they differ from each other. Some mutate the inputs using Burrows-Wheeler transformation and others permutate the content around the edges of common substrings, etc.
Radamsa is a good example of a fuzzer, created at the University of Oulu. Radamsa takes in a set of valid examples and fuzzes them. The output may contain number of invalid files. Radamsa can be obtained as a current Git snapshot from Akihe Gitlab page (which works at least on GNU/Linux and Mac OS X boxes with git installed). You can build it by doing the following:
git clone https://gitlab.com/akihe/radamsa.git
cd radamsa; make
bin/radamsa --help
To get the radamsa to produce fuzzed output is rather simple. In the following
example a string is piped to radamsa and radamsa prints out the mutated
version. Creating the samples one by one is daunting. Luckily radamsa gives
-n option so one can define how many samples it should create.
[user@laptop ~]$ echo "Cyber Security Base 101" | ./radamsa
Cyber Security Base 1701 1
[user@laptop ~]$ echo "Cyber Security Base 101" | ./radamsa -n 10
Cyber Security Base 1
Cyber Security Base 1
Cyber Security Base 340282366920938463463374607431768211455
Cyber Security Base 101
Cyber Security Base -1601859698619483283371
Cyber Security Base -1097337118446744073709551617
Cyber Security Base 0
Cyber Security Base 128
Cyber Security Base 102
Cyber Security Base 101
Cyber Security Base 128With files it is easier to use the -r option to get radamsa to read all the
samples and -o option to write the mutated samples to some folder. With %
sign you can add the number of the iteration to the file name.
radamsa -n 100 -o output-samples/img-%n.jpg -r orig-samples/By itself Radamsa does not inject the bad data to the target software. This has to be done somehow. Below is a simple example of a Bash script that takes the images created in the last example and feeds them to ImageMagick command-line tool and lets it resize them a bit and makes a conversion to them.
#!/bin/bash
for f in output-samples/*
do
	convert "$f" -resize 99% imgmgck-output/$(basename "$f" | cut -d . -f1).png
done
ImageMagick will complain about malformed images etc (roughly half of the mutated images were corrupt). But how do we know if something went really wrong and the program crashed? One way is to check what the convert returned using $?, which gives the return value of the last command. With classic test command you can test if the result was larger than 127 (indication of fatal program termination) and break the execution of the loop.
#!/bin/bash
for f in output-samples/*
do
	convert "$f" -resize 99% imgmgck-output/$(basename "$f" | cut -d . -f1).png
	test $? -gt 127 && break
done
More detailed instructions can be found from Akihe Gitlab page.
Test harnesses and debugging
The tools in the following list are more advanced and can be used to monitor the target application more closely. The list is by no means exhaustive.
GNU Project debugger (GDB) is a debugger that allows us to inspect what goes on inside another program while it is in execution. With GDB you can install breakpoints into the code and stop the execution on specified conditions or examine what happened when the program crashed.
Valgrind is an instrumentation framework for building dynamic analysis tools. Some of the most interesting Valgrind tools can automatically detect memory management and threading bugs. You can also use Valgrind to build new tools but the distribution includes six production-quality tools: a memory error detector, two thread error detectors, a cache and branch-prediction profiler, a call-graph generating cache and branch-prediction profiler, and a heap profiler.
Finally, strace and ltrace are a diagnostic, debugging and instructional userspace utilities for Linux. Strace is used to monitor interactions between processes and the Linux kernel, which include system calls, signal deliveries, and changes of process state, whereas ltrace is used to trace library calls.
BURP suite
This far this part of the course has concentrated on low level tools for application security testing. Now it is time to introduce the first security testing platform for security testing of web applications. It actually is a collection of tools that work together to create the tests. It covers tests for mapping and analysis of the vulnerabilities and even for exploiting them. Burp Suite can easily be extended with plugins such as Bradamsa (radamsa for burp Suite).
Burp suite can act as a proxy between the browser and target application and intercept and modify the traffic between them. It also contains tools such as a spider for crawling content and functionality, scanner for automatic detection of known vulnerabilities, an intruder that can be used to perform customized attacks. Here we look a bit into the proxy tool and how it works. As the last thing in this tools section we look a little into the intruder tool and specifically its sniper mode with bradamsa.
Burp proxy can be used to intercept the traffic between the browser and the target application. It works really similar to man-in-the-middle attacks. To test this feature we have a simple log in page that asks your credentials. The intercept mode of the suite has to be on for it to capture the traffic. In the intercept mode you have option to forward or drop the packets.
The proxy captures the HTTP headers and cookie details. Also the forms username and password are visible in the capture ("user" / "passwd"). Note that this was HTTP and not HTTPS (which would need a bit more work with tools such as SSLstrip script).
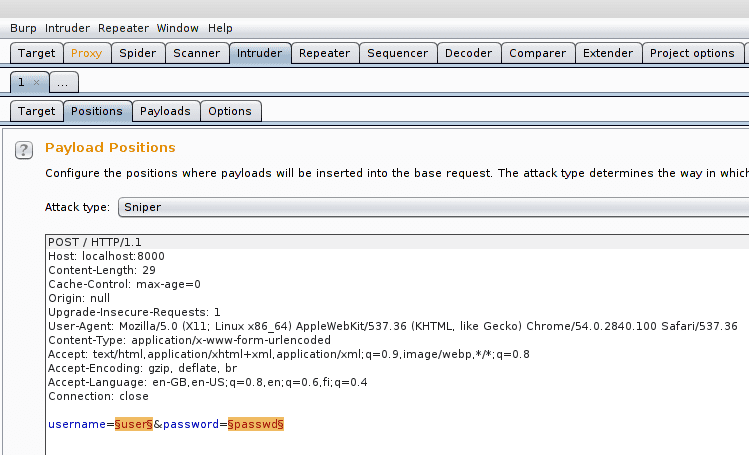
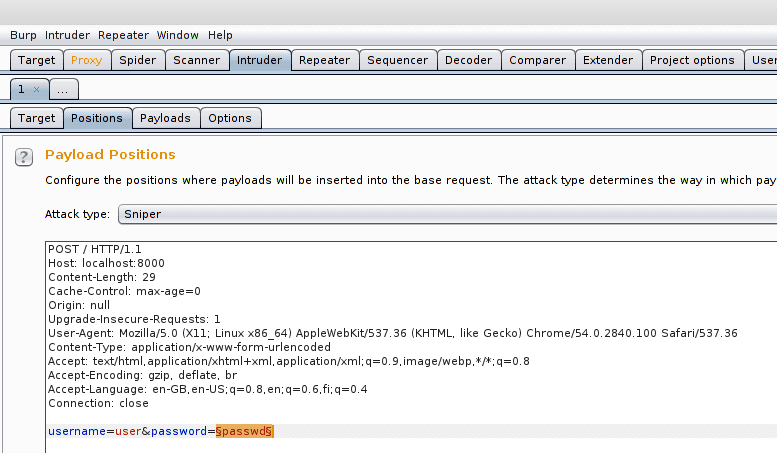
The intruder tool is used to automize attacks against web applications. This tool consists of four types of attacks: sniper, battering ram, pitchfork, and cluster bomb. For these attacks to work the tool automatically searches all the payload positions from the captured packets (see below in the image highlights enclosed with § signs). These positions are used by the attacks.
These positions are then replaced in the attack. With what are they replaced with depends on the attacker. Simplest way is to make a list of "good guesses" such as using a list of common passwords which are easily found from the net (small snippet below). Also tools such as Bradamsa, which is a Burp suite extension that uses Radamsa to generate the intruder payloads, can be used to create the payloads.
123456
password
12345678
qwerty
123456789
12345
1234
111111
1234567
dragon
123123
baseball
abc123
football
monkey
letmein
696969
shadow
master
666666
qwertyuiop
123321
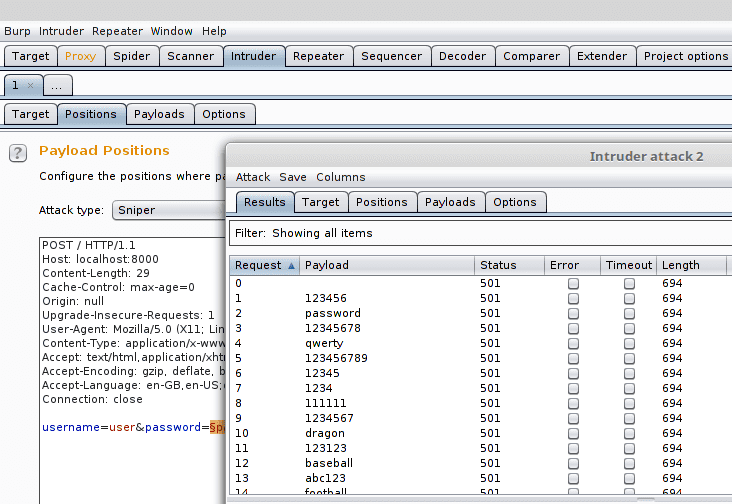
In the sniper attack only one of the positions is changed in sequence. In the battering ram multiple parameters can be replaced from the same payload list. In the pitchfork attack multiple lists of payloads for multiple parameters can be used simultaneously. In the cluster bomb multiple lists of payloads are used and all the combinations of them and the parameters are used. In this example sniper attack is used with a small set of common passwords above and only the password payload is changed.
The attack then tries all the passwords and gathers the resulting answers from the server (here only 501 replies as there was really nothing suitable listening on the other end).
Here, we looked at a few methods for finding vulnerabilities. In the next part, we will look into security issues in up to date web applications as well as study the culture related to fixing such issues in a rapid fashion.
Remember to check your points from the ball on the bottom-right corner of the material!


